The chainline I fixed on Saturday, after being incredibly frustrated with putting the chain back on the pedals several times a ride, whenever I didnt' throttle down fast enough when I had to slow down, or I habitually paused pedalling as I checked the road situation or something. I'd rather have a freewheel or a throttle controlled by pedal-chain tension, but for now this will have to do.
For now all I did was remove a few links so it's at the minimum necessary to go around the sprockets. Because of the spacing between the sprockets, and no adjustment possible for them, there's almost exactly 1 link (1/2") extra, which results in a lot of droop, and the chain bouncing off if there's no tensioner, whenever I hit even a little bitty bump.
So the above is how I rearranged the derailer so it is simply taking up that little slack--it's VERY VERY tight, and I expect it will wear out the derailer wheel more quickly than I would like, but it should survive until I build the real tensioner that will include the throttle control.
The whole chainline as it now exists:
Looks a lot more normal, and it has ZERO problems going in reverse (such as when backing up the bike) or being driven forward by the motor, neither of which was true before. It's worked even over some potholes that would have previously derailed the chain.
So now the bike looks like this:
including the other work I did today, such as changing out the handlebars for some old Schwinn "urban comfort" bike bars from the pile. I'd never thought I'd use them, because their grip angle doesn't suit riding upright, but they seem to fit a 'bent position pretty well.
I like their grips a lot better than the round grips made today for most bikes. They're sort of an ergonomic cross-section, and have between-finger-ridges that seem to fit my hands ok. Won't know exactly how good they are until I get a long ride on them, which should happen Friday, though I may test it Thursday if I have time, by riding around the neighborhood a lot instead of a long-distance destination trip.
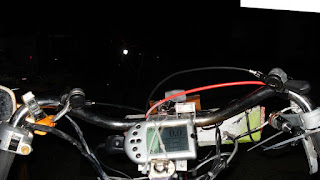
The rider's view isn't much different, though positions of things changed, and I'll have to get used to them again. A few things to fix still, like the throttle control is only ziptied on, until I find it's best position, after which I'll make a screw-mounting point for the bracket.
While trying to fix the slack in the motor chain, caused by vibration causing the motor to creep backwards on the mounting plate over time (because I didn't file down the edges of the boltholes in the plate well enough, I think), I managed to break off the only really long bolt I had holding it on:
The frontmost hole on the side towards you used to have that bolt. Now it's still got half of the shaft in the hole, blocking all the threads, so I can't put another one in there unless I can take it out of the motor's gearbox mounting plate. That plate is removable, so I should be able to do that, but it might be all the way down into the gearbox housing rather than the plate itself, and if it doesn't stick up at all I may not be able to remove it with the tools I have available. I *might* be able to drill a hole in the remains of the bolt, and tap threads into that, then screw something else into it with locktite on it's threads so that I can then remove the bolt remains, but I'm not confident that will work.
I also don't have any more bolts that are long enough with the right threads, so I'm going to have to dig into more of my salvaged items to see if there are things with 2"+ long bolts with the same threading and size as the brake-stud bolts on bikes (also the larger size accessory mount bolts are the same, but neither is long enough to fully thread in on the side row, only in the middle row).
This is a rear-looking oblique shot of the midships chassis area, showing the motor controller ziptied for now to the leftside seatstay of the Magna frame, with it's MOSFETs/heatsink ziptied to the downtube of the Schwinn frame.
The motor's hub and chainring are just visible at the bottom center of the pic, with the temporary lighting battery ziptied down (with one broken tie) at the left, just behind the Magna's seattube. Looks like a lot of stuff in there, but it's not. Just junky. :)
A full shot of the new handlebars, including the new position of the mirror. As before, I don't have the mirror above the bars because if I have to turn the bike over for any reason (like wheel maintenance) I don't want to have to remove or loosen the mirror.
Of course, the shifters are still in the way of flipping the bike over on it's bars, but one slight turn of the allen bolt on each one's mount and they can be rotated out of the way easily, and put right back when done. I'd rather move them totally out of the way, but there's not really a place to do that yet.
I'm considering a small clamped-on bar down from the inside top part of the bars that would let me parallel the shifters *inside* the grips, toward the center of the bike, with levers still sticking out. Like an L-bar, top of an L at each side of the bars before they join to the center mount, and bottom end of an L near the top of each grip, to hold the shifters. Not sure, so will work on the idea in sketches or something, then maybe a mockup, before altering the bars at all.
The new bars in side-view, from the left.
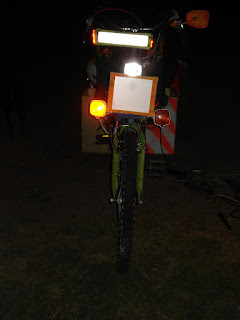
The whole bike from the front:
It's a pretty dark pic because the flash keeps getting tricked by the front reflector's brightness, no matter how I set the camera. :( There will be better pics in daylight in a future post.
While I was doing the other stuff, I also finally got around to both flipping the fork around and changing out the steering head to make steering more stable, by forcing me to use more handlebar input angle to get less actual steering angle (it's almost 1.7:1 now, I'd guess, where it used to be about 1:1).
The turn signals had to be flipped too, since they'd point backwards otherwise.
As I had welded their brackets to the fork to make things easier and quicker at the time, I got the grinder out to cut the very small welds I'd used, but the cheap HarborFreight grinder chose that moment to strip all the teeth of it's internal right-angle gearing, so now the motor works great, but spins the disc not at all. :( I don't think I can fix it.
Since the way the brackets and signals are made won't allow reverse mounting of the signals on the brackets, I just bent them (they're flimsy) down and twisted them 90° to make flat bottom-supports for the signals, and put a self-tapping screw thru the former mounting hole, up into the plastic bottom of the signal casings. Works fine, and now they're closer in by a little bit, too, making it maybe a bit easier to get around a doorframe as I take it in and out of the house and such.
The main reason to flip the fork around was to fix braking, which it did marvelously. Now I can actually lockup the wheel, which while undesirable in actual practice is required by Arizona law (brakes must be good enough to cause the bike to skid on a dry surface). Now I just have to get them adjusted for no squealing and the best grip without rubbing during a ride. (the wheel needs a bit of truing, too).
The change in steering heads lifted it up a bit higher in front, as the mounting point is above the head instead of below it, so I also flipped the rear mounting point:
Additionally, I had to use the Dremel to very slowly remove the built-up welded steering stops I'd put on this area of the frame, so that the front wheel can still be turned at least most of the way it used to be.
The side view of the new head:
I didn't have to do anything to this MTB steering head (handlebar clamp) besides leave off the top of the clamp, so I'd be able to thread in the bolt I already had in the steering tie rod from the old head (it's the same size and threading, apparently, despite different companies and perhaps 3 decades between them).
From the top it's more apparent what I did:
The four clamp bolt holes are spaced differently than the single clamp hole was on the old steering head, so that one set is closer to the pivot point in the steering tube, and one set is farther away. I'm using the farther set, which gives me a different ratio than the ~1:1 I had before, making it easier to steer, but less twitchy, since every little motion I make with the bars is not directly translated into the same motion of the front wheel, but reduced instead to not quite half. Much more stable now, and easier to steer.
One unfortunate side-effect is that due to the design of my rear steering rod pivot tab, since it's right and left limits are defined by the frame around it, I can't get the same amount of steering as I had before, meaning I will have to make wider turns than before, by a little bit.
You can see the full range above.
I can improve it by making the steering tab itself narrower, but it will also reduce it's strength unless I can make it thicker at the same time. For now I'll just wait and see how it rides over time, to see if it's even necessary to change it.
That's all for now, until the fixes for the fixes start. :)
Search all of my sites with Google
Tuesday, April 28, 2009
New Bars, "Power" Steering, Chainline Fix
Posted by
M.E.
at
4/28/2009 12:52:00 AM
![]()
Labels: Bike parts, brakes, chainlines, Fork, lights, motor, Parts I need, Recumbent, salvage, steering, throttle
Subscribe to:
Post Comments (Atom)


No comments:
Post a Comment
Alternate suggestions or improvements to anything that's been posted is very welcome, and extreme detail is preferred to brevity.
Keep in mind that unless you leave an email address in your comment, I haven't any way to reply to you except to reply to your comment here. That means if you want a reply, you'll have to come back to *this* blog entry and it's comments to see my reply to you, unless you leave some method of contact within your comment.